Add Disk Storage to Oracle Virtual Box
Are you looking to install software on your Virtual Box but running low on disk space? The obvious solution to this problem is to either have had set the size of hard disk to a large size when creating the Vitual Box image or re-size the disk later. If you are however using the Oracle’s supplied templates, like the Oracle Developer Day template, you don’t have much of a choice. At some point however, you will feel the need to add disk storage to Oracle VirtualBox by creating a new larger drive or grow the existing drive.
Here, I describe how to allocate more space by adding a virtual drive to a Virtual Box, running on a Windows machine. The Guest VirtualBox is running the Oracle Linux 6.5.
In short, the steps include first adding a Virtual drive via the Oracle VM Virtual Box Manager, identifying the device on the Linux Virtual Machine, partition it, format and then mount it.
Adding the Virtual Drive
From the Oracle VM Virtual Box Manager window, select the Virtual Box and click on Settings.
Go to Storage, select hard drive and click on Add a hard disk.
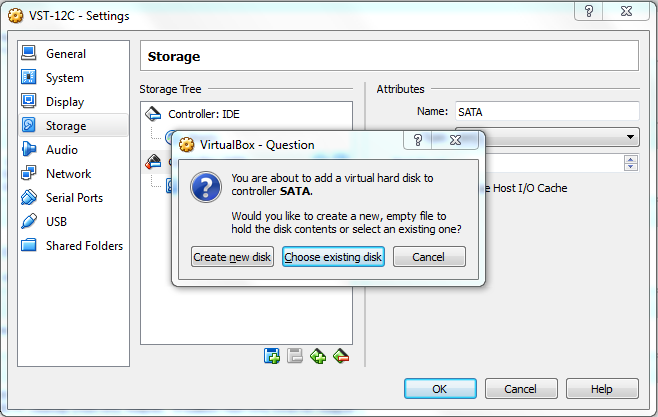
Click on Create New Disk.
Go to Storage, select hard drive and click on Add a hard disk.
Click on Create New Disk.
Follow the on screen instructions to create a new hard disk. The wizard will ask you the name of hard disk and location where you want to create it. Provide the directory on windows where you want the drive created.
Click OK when wizard completes to close the settings.
Click OK when wizard completes to close the settings.
Partition the Device
Turn on the VirtualBox now and switch to the root user.
Then use fdisk utility to get list of hard drives.
Then use fdisk utility to get list of hard drives.
$ fdisk -l
Disk /dev/sda: 107.4 GB, 107374182400 bytes
255 heads, 63 sectors/track, 13054 cylinders
Units = cylinders of 16065 * 512 = 8225280 bytes
Sector size (logical/physical): 512 bytes / 512 bytes
I/O size (minimum/optimal): 512 bytes / 512 bytes
Disk identifier: 0x000e4833
Device Boot      Start         End      Blocks   Id  System
/dev/sda1   *           1          64      512000   83  Linux Partition 1 does not end on cylinder boundary.
/dev/sda2              64       13055   104344576   8e  Linux LVirtualBox

Disk /dev/sdb: 12.9 GB, 12884901888 bytes
255 heads, 63 sectors/track, 1566 cylinders
Units = cylinders of 16065 * 512 = 8225280 bytes
Sector size (logical/physical): 512 bytes / 512 bytes
I/O size (minimum/optimal): 512 bytes / 512 bytes
Disk identifier: 0x00000000

Disk /dev/mapper/VolGroup-lv_root: 53.7 GB, 53687091200 bytes
255 heads, 63 sectors/track, 6527 cylinders
Units = cylinders of 16065 * 512 = 8225280 bytes
Sector size (logical/physical): 512 bytes / 512 bytes
I/O size (minimum/optimal): 512 bytes / 512 bytes
Disk identifier: 0x00000000

Disk /dev/mapper/VolGroup-lv_swap: 4227 MB, 4227858432 bytes
255 heads, 63 sectors/track, 514 cylinders
Units = cylinders of 16065 * 512 = 8225280 bytes
Sector size (logical/physical): 512 bytes / 512 bytes
I/O size (minimum/optimal): 512 bytes / 512 bytes
Disk identifier: 0x00000000

Disk /dev/mapper/VolGroup-lv_home: 48.9 GB, 48930750464 bytes
255 heads, 63 sectors/track, 5948 cylinders
Units = cylinders of 16065 * 512 = 8225280 bytes
Sector size (logical/physical): 512 bytes / 512 bytes
I/O size (minimum/optimal): 512 bytes / 512 bytes
Disk identifier: 0x00000000
We need to partition the /dev/sdb device.
Use the following command to partition the device.
fdisk /dev/sdb Follow the screen instructions as shown below.
# fdisk /dev/sdb
[/sociallocker] Device contains neither a valid DOS partition table, nor Sun, SGI or OSF disklabel
Building a new DOS disklabel with disk identifier 0x2e3c77cd.
Changes will remain in memory only, until you decide to write them.
After that, of course, the previous content won't be recoverable.
Warning: invalid flag 0x0000 of partition table 4 will be corrected by w(rite)
WARNING: DOS-compatible mode is deprecated. It's strongly recommended to
switch off the mode (command 'c') and change display units to
sectors (command 'u').
Command (m for help): n
Command action
e   extended
p   primary partition (1-4)
p

Partition number (1-4): 1
First cylinder (1-1566, default 1):
Using default value 1
Last cylinder, +cylinders or +size{K,M,G} (1-1566, default 1566):
Using default value 1566

Command (m for help): w

The partition table has been altered!
Calling ioctl() to re-read partition table.
Syncing disks.
We have used ‘n’ to create a new partition, p to create the partition as primary, 1 to specify the partition number and used defaults for begin and end range for partition size.
Finally ‘w’ to make changes permanent.
Query the partition table again.
Finally ‘w’ to make changes permanent.
Query the partition table again.
# fdisk -l
Disk /dev/sda: 107.4 GB, 107374182400 bytes
255 heads, 63 sectors/track, 13054 cylinders
Units = cylinders of 16065 * 512 = 8225280 bytes
Sector size (logical/physical): 512 bytes / 512 bytes
I/O size (minimum/optimal): 512 bytes / 512 bytes
Disk identifier: 0x000e4833

Device Boot      Start         End      Blocks   Id  System
/dev/sda1   *           1          64      512000   83  Linux
Partition 1 does not end on cylinder boundary.
/dev/sda2              64       13055   104344576   8e  Linux LVirtualBox

Disk /dev/sdb: 12.9 GB, 12884901888 bytes
255 heads, 63 sectors/track, 1566 cylinders
Units = cylinders of 16065 * 512 = 8225280 bytes
Sector size (logical/physical): 512 bytes / 512 bytes
I/O size (minimum/optimal): 512 bytes / 512 bytes
Disk identifier: 0x2e3c77cd

Device Boot      Start         End      Blocks   Id  System
/dev/sdb1               1        1566    12578863+  83  Linux
Disk /dev/mapper/VolGroup-lv_root: 53.7 GB, 53687091200 bytes
255 heads, 63 sectors/track, 6527 cylinders
Units = cylinders of 16065 * 512 = 8225280 bytes
Sector size (logical/physical): 512 bytes / 512 bytes
I/O size (minimum/optimal): 512 bytes / 512 bytes
Disk identifier: 0x00000000

Disk /dev/mapper/VolGroup-lv_swap: 4227 MB, 4227858432 bytes
255 heads, 63 sectors/track, 514 cylinders
Units = cylinders of 16065 * 512 = 8225280 bytes
Sector size (logical/physical): 512 bytes / 512 bytes
I/O size (minimum/optimal): 512 bytes / 512 bytes
Disk identifier: 0x00000000

Disk /dev/mapper/VolGroup-lv_home: 48.9 GB, 48930750464 bytes
255 heads, 63 sectors/track, 5948 cylinders
Units = cylinders of 16065 * 512 = 8225280 bytes
Sector size (logical/physical): 512 bytes / 512 bytes
I/O size (minimum/optimal): 512 bytes / 512 bytes
Disk identifier: 0x00000000
Format the Partition
Next step is to format the partition. Normally Linux uses ext4 now a day, so we can use that. You can format using the following command.
# mkfs.ext4 /dev/sdb1
mke2fs 1.41.12 (17-May-2010)
Filesystem label=
OS type: Linux
Block size=4096 (log=2)
Fragment size=4096 (log=2)
Stride=0 blocks, Stripe width=0 blocks
786432 inodes, 3144715 blocks
157235 blocks (5.00%) reserved for the super user
First data block=0
Maximum filesystem blocks=3221225472
96 block groups
32768 blocks per group, 32768 fragments per group
8192 inodes per group
Superblock backups stored on blocks:
32768, 98304, 163840, 229376, 294912, 819200, 884736, 1605632, 2654208
Writing inode tables: done
Creating journal (32768 blocks): done
Writing superblocks and filesystem accounting information: done
This filesystem will be automatically checked every 25 mounts or
180 days, whichever comes first.  Use tune2fs -c or -i to override.
Mounting the Partition
This partition can now be mounted to location of your choosing. For example if you want to mount this under /u02. Here the steps.
# mkdir -p /u02
# mount /dev/sdb1 /u02
# ll /u02
total 16
drwx------ 2 root root 16384 Feb  1 23:07 lost+found
Presence of lost+found directory suggests that we are ready to go.
You don’t have to do all these steps again except for very last mount command. It will be required on every reboot.
You can avoid that as well by putting the following entry into /etc/fstab file.
/dev/sdb1 /u02 ext4 defaults 1 2

Comments
Post a Comment