Simple Steps for Vertica Database Installation
Types:
1. Installing Vertica Manually:
Manually installing Vertica through the command line works on all platforms. You will first set up a cluster of nodes, then install Vertica.
2. Install Vertica Automatically :
Automatic installation is available on Amazon AWS, Google Cloud Platform, and Microsoft Azure.
Automatic installation deploys a pre-configured environment consisting of cloud resources on which your cluster can run, with Vertica and Management Console already installed. Enter a few parameters into a template on your chosen platform, and quickly to get up and running with Vertica.
Manual Vertica database Installation or Setup :
For Clustering, Vertica required minimum three (3) nodes. Therefore, You need to have three Linux OS on three different nodes.
- Both the catalog and data directories must be owned by the database superuser.
- Do not use a shared directory for more than one node. Data and catalog directories must be distinct for each node. Multiple nodes must not be allowed to write to the same data or catalog directory.
- When you install Vertica, the
--data-dirparameter in theinstall_verticascript lets you specify a directory to contain database data and catalog files. The script defaults to the database administrator's default home directory/home/dbadmin. - The data and catalog directory must exist on each node in the cluster.
- The directory on each node must be owned by the database administrator
Operational System Setup (Linux-CentOS x64 or RedHat x64)
1-Increase the swap space to a minimum of 2 Gb
2-Space and CPU requirements:
-Vertica requires at least 1 GB per CPU.
-disk utilization per node should no more than sixty percent (60%). Disk space is temporarily required by certain query execution operators, such as hash joins and sorts, in the case when they have to spill to disk.
-configure TEMP SPACE separate from data disk space.
3-Install the prerequisite for Vertica Cluster
yum install  rsync  python*  telnet ruby*  java* sudo  openssh-server openssh-clients
chkconfig sshd on
service sshd start
4-Edit the /etc/pam.d/su file
vi  /etc/pam.d/su
#add the line
session required pam_limits.so
5-Verify that the NTP Daemon is Running
chkconfig --list ntpd
#if is not on use the commands
chkconfig ntpd on
#start ntp service
/etc/init.d/ntpd start
6-Remove Nonessential Applications
For optimal performance, Vertica is designed to use all available resources on each host machine. Vertica recommends that you remove or disable all non-essential applications from cluster hosts.
7-Configuring the Network
Alter the /etc/hosts file. Make sure file exists and that it contains the loopback address 127.0.0.1
7.1-Setting Up Cluster Hosts
Make sure that the /etc/hosts file includes all of the hosts that become part of the cluster. For example, if the hosts are named host01, host02, host03, and host04, the /etc/hosts file on each host looks like this:
# Do not remove the following line, or various programs
# that require network functionality will fail.
127.0.0.1               localhost.localdomain localhost
192.xxx.13.128          host01
192.xxx.13.129          host02
192.xxx.13.130          host03
192.xxx.13.131          host04
This should be done in all hosts(nodes)
7.2- Edit the /etc/sysconfig/network file :
vim /etc/ sysconfig/network
Alter the hostname and set it to the desired name :
HOSTNAME=host01
7.3 Setting the HOSTNAME Environment Variable
vim /etc/profile or /etc/bashrc
Add the line
export HOSTNAME=hostname
7.4-Verify that the hostname resolution works correctly Verify this with the command
/bin/hostname
Hostname
Restart the hosts(nodes) Make sure you do all this steps in all Hosts(nodes)as root user.
7.5 Disable the firewall
Firewalls not recommended for database hosts SELinux (Security-Enhanced Linux) Iptables
7.6 Provide Root and for dbadmin user to SSH Access to the Cluster
Steps to do it for root or dbadmin user:
[root@Vertica_Master1 ~]# ssh-keygen
Generating public/private rsa key pair.
Enter file in which to save the key (/root/.ssh/id_rsa):
/root/.ssh/id_rsa already exists.
Overwrite (y/n) y
Enter passphrase (empty for no passphrase):
Enter same passphrase again:
Your identification has been saved in /root/.ssh/id_rsa.
Your public key has been saved in /root/.ssh/id_rsa.pub.
The key fingerprint is:
7c:b5:11:48:d3:c1:e6:f5:80:b3:4a:4a:93:ed:16:99
 root@Vertica_Master1
The key's randomart image is:
+--[ RSA 2048]----+
|         .o+oo   |
|          ..*.o  |
|         o =o+ o |
|       .+ E.oo  .|
|       .S=.o.    |
|        ..+      |
|         .       |
|                 |
|                 |
+-----------------+
[root@Vertica_Master1 ~]# cd ~
[root@Vertica_Master1 ~]# chmod 700 .ssh
[root@Vertica_Master1 ~]# cd .ssh/
[root@Vertica_Master1 .ssh]# cp id_rsa.pub authorized_keys
Do on all hosts the steps show upper and then follow the next steps
[root@Vertica_Master1 .ssh]# cat id_rsa.pub
ssh-rsa AAAAB3NzaC1yc2EAAAABIwAAAQEArX26Pgsyvkw+o0Vimm26FSOAtTh9C9
mZ+tS7LfO92y7RDKsSm38tSQO/p1f2NWP6UzAam8dG77Zo8W+wjwF6bEJbFU9Gq+S/j
hETD8bMTKh6odZNhXmZanddvH4qnA0eKngAPe9Y93udA6kEYGpA0sCWMFcbrtvwraz7@Vertica_Master1
[root@Vertica_Master1 .ssh]# ssh root@Vertica_Master2
The authenticity of host 'vertica_master2 (10.xxx.1.224)' can't be established.
RSA key fingerprint is ff:9c:48:27:7d:6b:a1:39:5a:17:d0:a3:a3:9d:f0:48.
Are you sure you want to continue connecting (yes/no) yes
Warning: Permanently added 'vertica_master2,10.xxx.1.224' (RSA) to the list of known hosts.
root@vertica_master2's password:xxxxxx- this is the password for the root user
Last login: Tue Sep  4 15:11:35 2012 from e05347
-bash: Vertica_Master2: command not found
[root@Vertica_Master2 ~]# hostname-check to see that you are on the Vertica_Master2
Vertica_Master2

[root@Vertica_Master1 .ssh]# vim authorized_keys
And copy the the content of the id_rsa.pub into authorized_keys and save it .
Do this for all hosts so that they all have the keys form all hosts in their authorized_keys file.
- Host1 will hold host1,host2,host3 public keys inside
- Host2 will hold host1,host2,host3 public keys inside
- Host3 will hold host1,host2,host3 public keys inside
-and so on if you have more hosts in your cluster.
8 -Download and install Vertica software on Master Node(where you will run the Administrative jobs of the cluster)
As root :
#rpm -ihv  vertica-<version>.x86_64.RHEL5.rpm
After entering the command, a progress indicator appears:
Preparing...   ##################################### [100%]
1:vertica      ##################################### [100%]
Vertica 6.0.xx successfully installed on host hostname.
In the previous step, we installed the package on only one machine. Note that Vertica is installed under /opt/vertica. Now, we will set up Vertica on other nodes as well. For that, run the following command on the same node:
8.1- Run the Install Script
On the master node run the following command(The master node would be the node you most access for admin work)
/opt/vertica/sbin/install_vertica -s host_list -r rpm_package -u dba_username
Where options are :
- –s is the hostname/IP of all the nodes of the cluster, including the one on which Vertica is already installed.
- –r is the path of the Vertica package
- –u is the username that we wish to create for working on Vertica. This user has sudo privileges. If prompted, provide a password for the new user. If we do not specify any username, then Vertica creates dbadmin as the user, as shown in the following example:
-s host01,host02,host03
or
-s 192.xxx.233.101,192.xxx.233.102,192.xxx.233.103
- If you omit the parameter, the default database administrator account name is dbadmin.
Example of full command for 3 nodes cluster :
# /opt/vertica/sbin/install_vertica -s 10.xxx.1.216,10.xxx.1.224,10.xxx.1.225 -r
 /home/user/Downloads/vertica-6.0.0-3.x86_64.RHEL5.rpm -u dbadmin
$ sudo /opt/vertica/sbin/install_vertica -s 192.168.56.101,192.168.56.101,192.168.56.102 -r "/ilabs/setups/vertica-6.1.3-0.x86_64.RHEL5.rpm" -u dbadmin


Vertica Analytic Database 6.1.3-0 Installation Tool
Upgrading admintools meta data format..
scanning /opt/vertica/config/users
Starting installation tasks...
Getting system information for cluster (this may take a while)....

Enter password for impetus@192.168.56.102 (2 attempts left):
backing up admintools.conf on 192.168.56.101
Default shell on nodes:
192.168.56.101 /bin/bash
192.168.56.102 /bin/bash

Installing rpm on 1 hosts....
installing node....  192.168.56.102

NTP service not synchronized on the hosts: ['192.168.56.101', '192.168.56.102']

Check your NTP configuration for valid NTP servers.


Vertica recommends that you keep the system clock synchronized using NTP or some other time synchronization mechanism to keep all hosts synchronized. Time variances can cause (inconsistent) query results when using Date/Time Functions. For instructions, see:
  * http://kbase.redhat.com/faq/FAQ_43_755.shtm
  * http://kbase.redhat.com/faq/FAQ_43_2790.shtm

Info: the package 'pstack' is useful during troubleshooting.  Vertica recommends this package is installed.

Checking/fixing OS parameters.....
Setting vm.min_free_kbytes to 37872 ...
Info! The maximum number of open file descriptors is less than 65536
Setting open filehandle limit to 65536 ...
Info! The session setting of pam_limits.so is not set in /etc/pam.d/su
Setting session of pam_limits.so in /etc/pam.d/su ...
Detected cpufreq module loaded on 192.168.56.101
Detected cpufreq module loaded on 192.168.56.102
CPU frequency scaling is enabled.  This may adversely affect the performance of your database.
Vertica recommends that cpu frequency scaling be turned off or set to 'performance'

Creating/Checking Vertica DBA group

Creating/Checking Vertica DBA user

Password for dbadmin:
Installing/Repairing SSH keys for dbadmin

Creating Vertica Data Directory...

Testing N-way network test.  (this may take a while)
 All hosts are available                            ...
Verifying system requirements on cluster.
 IP configuration                                   ...
 IP configuration                                   ...
Testing hosts (1 of 2)....

Running Consistency Tests
 LANG and TZ environment variables                  ...
Running Network Connectivity and Throughput Tests...
Waiting for 1 of 2 sites...                         ...

  Test of host 192.168.56.101 (ok)
====================================

    Enough RAM per CPUs (ok)
  --------------------------------


  Test of host 192.168.56.102 (ok)
====================================

    Enough RAM per CPUs (FAILED)
  --------------------------------
    Vertica requires at least 1 GB per CPU (you have 0.71 GB/CPU)
    See the Vertica Installation Guide for more information.


  Consistency Test (ok)
=========================

  Info: The $TZ environment variable is not set on  192.168.56.101
  Info: The $TZ environment variable is not set on  192.168.56.102

Updating spread configuration...
Verifying spread configuration on whole cluster.
Creating node node0001 definition for host 192.168.56.101
... Done
Creating node node0002 definition for host 192.168.56.102
... Done
Error Monitor  0 errors  4 warnings
Installation completed with warnings.
Installation complete.

To create a database:
1. Logout and login as dbadmin.**
2. Run /opt/vertica/bin/adminTools as dbadmin
3. Select Create Database from the Configuration Menu

** The installation modified the group privileges for dbadmin.
   If you used sudo to install vertica as dbadmin, you will
   need to logout and login again before the privileges are applied.
9 – Create the Vertica Data and Catalog directories on each node:
Directory names are totally up to you. Remember that database user must have owner rights over them.
Note: this refers to extra directories added after installation
mkdir /vertica_db/data
mkdir /vertica_db/data
chown  dbadmin:dbadmin  vertica_db/
10- Add the /opt/vertica/bin to you dbadmin user path so you can access the vertica tools without the full path.
11- Access the adminTool :
/opt/vertica/bin/adminTools
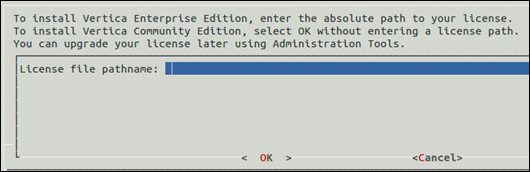
If you are connecting to admin tools for the first time, you will be prompted for a license key. If you have the license file, then enter its path; if you want to use the community edition, then just click on OK.
License key prompt :
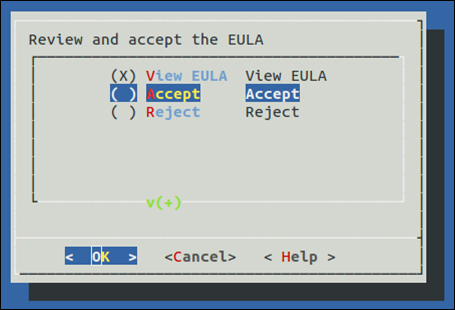
After the previous step, you will be asked to review and accept the End-user License Agreement (EULA).
Prompt for EULA
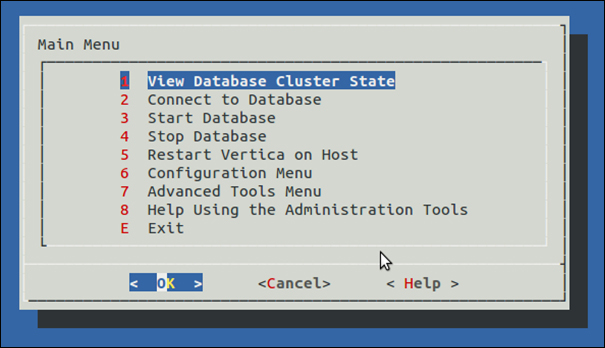
After reviewing and accepting the EULA, you will be presented with the main menu of the admin tools of Vertica.
Admin tools main menu :
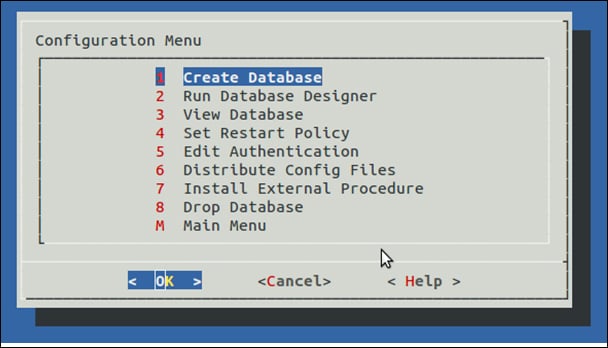
Now, to create a database, navigate to Administration Tools | Configuration Menu | Create Database.
The Create Database option in the configuration menu :
Now, you will be asked to enter a database name and a comment that you would like to associate with the database.
Database name and comments :
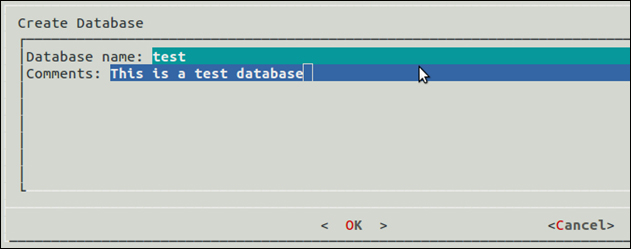
After entering the name and comment, you will be prompted to enter a password for this database.
Password for the new database

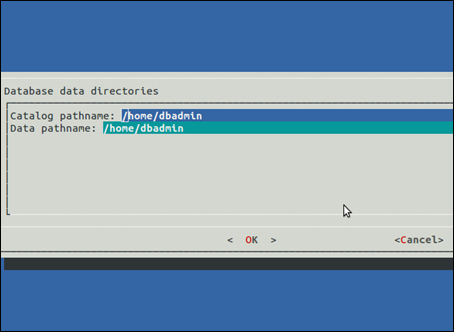
After entering and re-entering (for confirmation) the password, you need to provide pathnames where the files related to user data and catalog data will be stored.
Catalog and data path names :
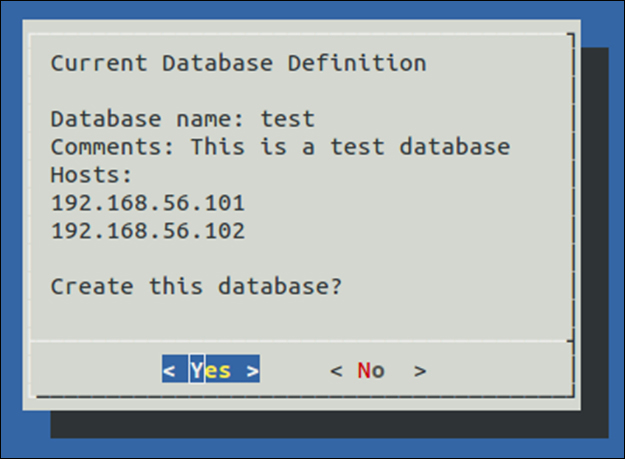
After providing all the necessary information related to the database, you will be asked to select hosts on which the database needs to be deployed. Once all the desired hosts are selected, Vertica will ask for one final check.
Final confirmation for database creation:
Now, Vertica will create and deploy the database.
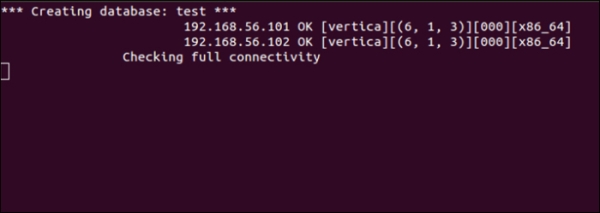
Once the database is created, we can connect to it using the VSQL tool or perform admin tasks.
License key prompt :
After the previous step, you will be asked to review and accept the End-user License Agreement (EULA).
Prompt for EULA
After reviewing and accepting the EULA, you will be presented with the main menu of the admin tools of Vertica.
Admin tools main menu :
Now, to create a database, navigate to Administration Tools | Configuration Menu | Create Database.
The Create Database option in the configuration menu :
Now, you will be asked to enter a database name and a comment that you would like to associate with the database.
Database name and comments :
After entering the name and comment, you will be prompted to enter a password for this database.
Password for the new database
After entering and re-entering (for confirmation) the password, you need to provide pathnames where the files related to user data and catalog data will be stored.
Catalog and data path names :
After providing all the necessary information related to the database, you will be asked to select hosts on which the database needs to be deployed. Once all the desired hosts are selected, Vertica will ask for one final check.
Final confirmation for database creation:
Now, Vertica will create and deploy the database.
Once the database is created, we can connect to it using the VSQL tool or perform admin tasks.

Comments
Post a Comment