Vertica Database Administration Tools and Management Console
Vertica Database Administration Tools :
- The Vertica Administration tools allow you to easily perform administrative tasks. You can perform most Vertica database administration tasks with Administration Tools.
- Run Administration Tools using the Database Superuser account on the Administration host, if possible. Make sure that no other Administration Tools processes are running.
- If the Administration host is unresponsive, run Administration Tools on a different node in the cluster. That node permanently takes over the role of Administration host.
What is Vertica Database Superuser :
- The automatically-created database user who has the same name as the Linux database administrator account and who can bypass all GRANT/REVOKE authorization, or any user that has been granted the PSEUDOSUPERUSER role. Do not confuse the concept of a database superuser with Linux superuser (root) privilege. A database superuser cannot have Linux superuser privilege.
Running the Administration Tools:
As the dbadmin user, you can run administration tools. The syntax follows:
/opt/vertica/bin/admintools [--debug ][
     { -h | --help }
   | { -a | --help_all}
   | { -t | --tool } name_of_tool[ options]
An unqualified
admintools command displays the Main Menu dialog box.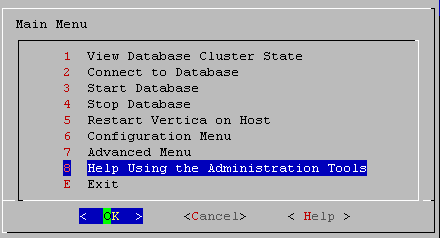
The first time you log in as the Database Superuser and run the Administration Tools, the user interface displays.
- In the end-user license agreement (EULA ) window, type
acceptto proceed.A window displays, requesting the location of the license key file you downloaded from the Vertica website. The default path is/tmp/vlicense.dat. - Type the absolute path to your license key (for example,
Using the Administration Tools Interface:
The Vertica Administration Tools are implemented using Dialog, a graphical user interface that works in terminal (character-cell) windows.The interface responds to mouse clicks in some terminal windows, particularly local Linux windows, but you might find that it responds only to keystrokes. Thus, this section describes how to use the Administration Tools using only keystrokes.
Enter [Return]
In all dialogs, when you are ready to run a command, select a file, or cancel the dialog, press the Enter key. The command descriptions in this section do not explicitly instruct you to press Enter.
OK - Cancel - Help
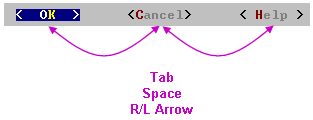 The OK, Cancel, and Help buttons are present on virtually all dialogs. Use the tab, space bar, or right and left arrow keys to select an option and then press Enter. The same keystrokes apply to dialogs that present a choice of Yes or No. The OK, Cancel, and Help buttons are present on virtually all dialogs. Use the tab, space bar, or right and left arrow keys to select an option and then press Enter. The same keystrokes apply to dialogs that present a choice of Yes or No. |
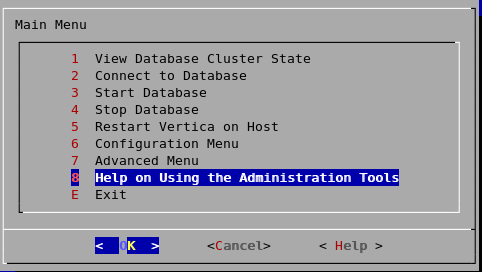
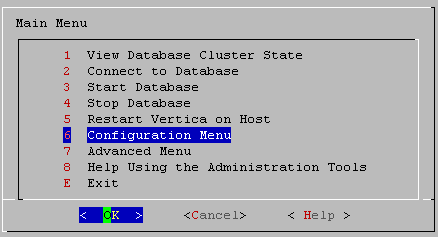
Menu Dialogs
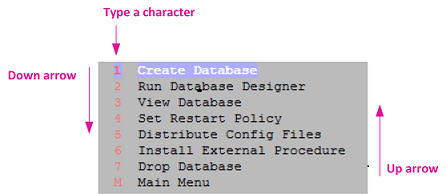 Some dialogs require that you choose one command from a menu. Type the alphanumeric character shown or use the up and down arrow keys to select a command and then press Enter. Some dialogs require that you choose one command from a menu. Type the alphanumeric character shown or use the up and down arrow keys to select a command and then press Enter. |
List Dialogs
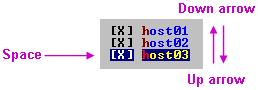 In a list dialog, use the up and down arrow keys to highlight items, then use the space bar to select the items (which marks them with an X). Some list dialogs allow you to select multiple items. When you have finished selecting items, press Enter. In a list dialog, use the up and down arrow keys to highlight items, then use the space bar to select the items (which marks them with an X). Some list dialogs allow you to select multiple items. When you have finished selecting items, press Enter. |
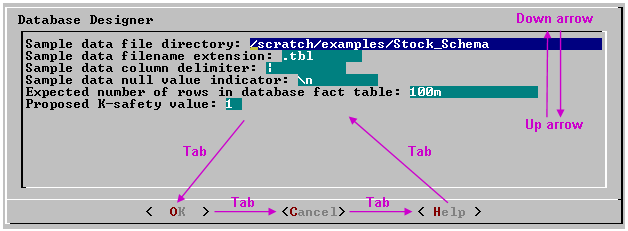
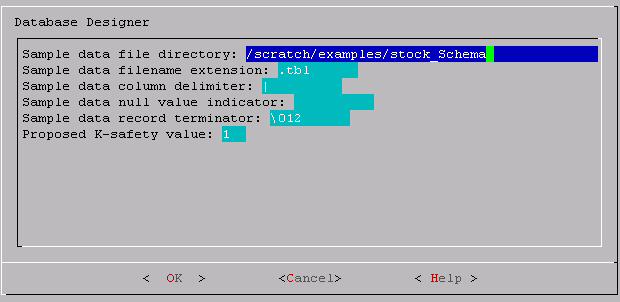
Form Dialogs
In a form dialog (also referred to as a dialog box), use the tab key to cycle between OK, Cancel, Help, and the form field area. Once the cursor is in the form field area, use the up and down arrow keys to select an individual field (highlighted) and enter information. When you have finished entering information in all fields, press Enter.
K‑safety sets fault tolerance for the database cluster, where K can be set to 0, 1, or 2. The value of K specifies how many copies Vertica creates of segmented projection data. If K‑safety for a database is set to 1 or 2, Vertica creates K+1 instances, or buddies, of each projection segment. Vertica distributes these buddies across the database cluster, such that projection data is protected in the event of node failure. If any node fails, the database can continue to process queries so long as buddies of data on the failed node remain available elsewhere on the cluster.
Vertica splits segmented projections into chunks (segments) of similar size and distributes these segments evenly across the cluster. System K-safety determines how many duplicates (buddies) of each segment are created and maintained on different nodes.
You create segmented projections with a
CREATE PROJECTION statement that includes a SEGMENTED BY clause.
Projection segmentation achieves the following goals:
- Ensures high availability and recovery.
- Spreads the query execution workload across multiple nodes.
- Allows each node to be optimized for different query workloads.
Specifies how to distribute projection data with one of the following clauses:
- hash‑segmentation‑clause: Specifies to segment projection data evenly and distribute across cluster nodes. Vertica recommends segmenting large tables.
- unsegmented‑clause: Specifies to create an unsegmented projection, tables are replicated without segmentation on all cluster nodes.
Difference Between Administration Tools and Management Console:
You can perform most database administration tasks using the Administration Tools, but you have the additional option of using the more visual and dynamic Management Console.
A database management tool that provides a unified view of your database and lets you monitor multiple clusters from a single point of access.
| Vertica Functionality | Management Console | Administration Tools |
|---|---|---|
Use a Web interface for the administration of Vertica
|
Yes
|
No
|
Manage/monitor one or more databases and clusters through a UI
|
Yes
|
No
|
Manage multiple databases on different clusters
|
Yes
|
Yes
|
View database cluster state
|
Yes
|
Yes
|
View multiple cluster states
|
Yes
|
No
|
Connect to the database
|
Yes
|
Yes
|
Start/stop an existing database
|
Yes
|
Yes
|
Stop/restart Vertica on host
|
Yes
|
Yes
|
Kill a Vertica process on host
|
No
|
Yes
|
Create one or more databases
|
Yes
|
Yes
|
View databases
|
Yes
|
Yes
|
Remove a database from view
|
Yes
|
No
|
Drop a database
|
Yes
|
Yes
|
Create a physical schema design (Database Designer)
|
Yes
|
Yes
|
Modify a physical schema design (Database Designer)
|
Yes
|
Yes
|
Set the restart policy
|
No
|
Yes
|
Roll back database to the Last Good Epoch
|
No
|
Yes
|
Manage clusters (add, replace, remove hosts)
|
Yes
|
Yes
|
Rebalance data across nodes in the database
|
Yes
|
Yes
|
Configure database parameters dynamically
|
Yes
|
No
|
View database activity in relation to physical resource usage
|
Yes
|
No
|
View alerts and messages dynamically
|
Yes
|
No
|
View current database size usage statistics
|
Yes
|
No
|
View database size usage statistics over time
|
Yes
|
No
|
Upload/upgrade a license file
|
Yes
|
Yes
|
Warn users about license violation on login
|
Yes
|
Yes
|
Create, edit, manage, and delete users/user information
|
Yes
|
No
|
Use LDAP to authenticate users with company credentials
|
Yes
|
Yes
|
Manage user access to MC through roles
|
Yes
|
No
|
Map Management Console users to a Vertica database
|
Yes
|
No
|
Enable and disable user access to MC and/or the database
|
Yes
|
No
|
Audit user activity on database
|
Yes
|
No
|
Hide features unavailable to a user through roles
|
Yes
|
No
|
Generate new user (non-LDAP) passwords
|
Yes
|
No
|
The following management functions within the Administration Tools are operational when some nodes are unresponsive.
- View database cluster state
- Connect to database
- Start database (including manual recovery)
- Stop database
- Replace node (assuming node that is down is the one being replaced)
- View database parameters
- Upgrade license key
The following operations work with unresponsive nodes; however, you might have to repeat the operation on the failed nodes after they are back in operation:
- Distribute config files
- Install external procedure
- (Setting) database parameters
The following management functions within the Administration Tools require that all nodes be UP in order to be operational:
- Create database
- Run the Database Designer
- Drop database
- Set restart policy
- Roll back database to Last Good Epoch
Management Console Provides some, but Not All of the Functionality Provided By the Administration Tools. MC Also Provides Functionality Not Available in the Administration Tools.
PuTTY Administration Tools :
If you are using PuTTY, you can make the Administration Tools look like the screen captures in this document:
- In a PuTTY window, right click the title area and select Change Settings.
- Create or load a saved session.
- In the Category dialog, click Window > Appearance.
- In the Font settings, click the Change... button.
- Select Font: Courier New: Regular Size: 10
- Click Apply.
Repeat these steps for each existing session that you use to run the Administration Tools.
You can also change the translation to support UTF-8:
- In a PuTTY window, right click the title area and select Change Settings.
- Create or load a saved session.
- In the Category dialog, click Window > Translation.
- In the "Received data assumed to be in which character set" drop-down menu, select UTF-8.
- Click Apply.
Using the Administration Tools :
The Help on Using the Administration Tools command displays a help screen about using the Administration Tools.
Most of the online help in the Administration Tools is context-sensitive. For example, if you use up/down arrows to select a command, press tab to move to the Help button, and press return, you get help on the selected command.
In a Menu Dialog
- Use the up and down arrow keys to choose the command for which you want help.
- Use the Tab key to move the cursor to the Help button.
- Press Enter (Return).
In a Dialog Box
- Use the up and down arrow keys to choose the field on which you want help.
- Use the Tab key to move the cursor to the Help button.
- Press Enter (Return).
Scrolling
Some help files are too long for a single screen. Use the up and down arrow keys to scroll through the text.
Authentication:
When you create a new user with the CREATE USER command, you can configure the password or leave it empty. You cannot bypass the password if the user was created with a password configured. You can change a user's password using the ALTER USER command.
Vertica provides tools and features that allow you to ensure your system is secure as well as to prevent unauthorized users from accessing sensitive information.
Client Authentication establish the identity of the requesting client and determines whether that client is authorized to connect to the Vertica server.
Client Authentication:
When connecting to a Vertica database, a user or client application must supply the name of a valid user account. In addition, the application usually includes a means of authentication, such as a password or security certificate.
There are two types of client authentication:
- LOCAL—Authenticating users or applications that are trying to connect from the same node that the database is running on.
- HOST—Authenticating users or applications that are trying to connect from a node that has a different IPv4 or IPv6 address than the database.
The DBADMIN user manages the client authentication information that the database uses to authenticate users.
Encrypting Client-Server Communication
Vertica uses Secure Socket Layer (SSL) and Transport Layer Security (TLS) to establish a secure connection between the client machine and the server. Configure SSL/TLS to:
- Authenticate the server so the client can confirm the server's identity. Vertica supports mutual authentication in which the server can also confirm the identity of the client. This authentication helps prevent "man-in-the-middle" attacks.
- Encrypt data sent between the client and database server to significantly reduce the likelihood that the data can be read if the connection between the client and server is compromised.
- Verify that data sent between the client and server has not been altered during transmission.
TLS Authentication
Server authentication methods define how clients connect to a Vertica server. Before you define a TLS authentication method, you should understand what type of authentication methods your Vertica server supports. You should also perform any prerequisite tasks.
In regards to SSL, your server can operate with:
- No SSL
- SSL Server Mode —The client does not need certificate or key files.
- SSL Mutual Mode —The client needs certificate, key, and certificate authority files.
SSL modes are independent of authentication, except that the SSL client self-authentication method requires that your server be set-up in SSL Mutual Mode. Otherwise, if you are not implementing client self-authentication method, you can use TLS authentication with either SSL Server Mode or SSL Mutual Mode.
Before you create a TLS authentication method, perform the pre-requisite tasks necessary for your specific environment (for example, certificate creation). Refer to TLS/SSL Server Authentication and all subsections applicable to your environment.
SSL Authentication
To protect privacy and verify data integrity, you can configure Vertica and database clients to use Secure Socket Layer (SSL). SSL allows secure connection and communication between the client and the server. The SSL protocol uses a trusted third party called a Certificate Authority (CA). Both the owner of a certificate and the party that relies on the certificate trust the CA.
Vertica supports the following authentication methods under Transport Layer Security (TLS) v1.0, v1.1, and v1.2 protocol:
- SSL server authentication — Lets the client confirm the server's identity. The client verifies that the server's certificate and public key are valid and were issued by a certificate authority (CA) listed in the client's list of trusted CAs. This authentication helps prevent man-in-the-middle attacks.
- SSL client authentication — (Optional) Lets the server confirm the client's identity. The server verifies that the client's certificate and public key are valid and were issued by a certificate authority (CA) listed in the server's list of trusted CAs. Client authentication is optional because Vertica can authenticate the client at the application protocol level through user name and password credentials.
- Encryption — Encrypts data sent between the client and database server. This method significantly reduces the likelihood that the data can be read if the connection between the client and server is compromised. Encryption works at both ends of a transaction, regardless of whether SSL Client Authentication is enabled.
- Data integrity — Verifies that data sent between the client and server has not been altered during transmission.
The CA issues electronic certificates to identify one or both ends of a transaction. These certificates to verify ownership of a public key by the name on the certificate.
Public and Private Keys
A CA issues digital certificates that contain a public key and the identity of the owner.
The public key is available to all users through a publicly accessible directory. However, private keys are confidential to their respective owners. When you use a private/public key pair, the data is encrypted by one key and decrypted by its corresponding key.
- If encrypted with a public key, data can be decrypted by its corresponding private key only.
- If encrypted with a private key, data can be decrypted by its corresponding public key only.
For example, suppose Alice wants to send confidential data to Bob. Because she wants only Bob to read it, she encrypts the data with Bob's public key. Even if someone else gains access to the encrypted data, it remains protected. Because only Bob has access to his corresponding private key, he is the only person who can decrypt Alice's encrypted data back into its original form.
For More Details :
Authentication Management
Users with the DBADMIN can manage the following authentication tasks
- Create authentication records using CREATE AUTHENTICATION.
- Configure client authentication so that the DBADMIN user can always access the database locally. If a problem occurs with the authentication that blocks all users from logging in, the DBADMIN user needs access to correct the problem.
- Assign a specific authentication method to a user using GRANT (Authentication).
- Use ALTER AUTHENTICATION to:
- Enable/disable authentication methods.
- Define a default authentication method to be used if a user has not been assigned a specific authentication method.
- Define parameters required by LDAP, Ident, and Kerberos authentication methods.
- Revoke a user's authentication record using REVOKE Authentication. This user now uses the default authentication.
- Delete an authentication record from the database using DROP AUTHENTICATION. Any users assigned the dropped record now use the default authentication method.
CREATE AUTHENTICATION
Creates and enables an authentication method associated with users or roles. Vertica enables the authentication method automatically.
Syntax
CREATE AUTHENTICATION auth‑method‑name METHOD 'auth‑type' access‑method
Parameters
:
Name
|
Description
|
auth‑method‑name
|
Name of the authentication method
to create, where auth-method-name conforms
to conventions described in Identifiers.
Identifiers (names) of objects such
as schema, table, projection, column names, and so on, can be up to 128 bytes
in length.
|
auth‑type
|
Name
of the authentication method to use, one of the following:
|
access‑method
|
The
access method the client uses to connect, specified in one of the following
ways:
Matches connection attempts made using local domain sockets.
Matches connection attempts made using TCP/IP, where host-ip-address can be an IPv4 or IPv6 address. You can qualify HOST with one of the following options
|
Some authentication methods cannot be designated as local, as listed in this table:
Authentication Method
|
Local?
|
Host?
|
Kerberos (GSS)
|
No
|
Yes
|
Ident
|
Yes
|
No
|
LDAP
|
Yes
|
Yes
|
Hash
|
Yes
|
Yes
|
Reject
|
Yes
|
Yes
|
Trust
|
Yes
|
Yes
|
- The DBADMIN user must have access to the database at all times.
- The DBADMIN account must authenticate against the database using local trust or local hash authentication.
- Vertica recommends that you create an authentication method (LOCAL TRUST or LOCAL PASSWORD) with a very high priority, say, 10,000. Grant this method to the DBADMIN user and set the priority using ALTER AUTHENTICATION.
- With the high priority, this new authentication method supersedes any authentication methods you create for PUBLIC (which includes the DBADMIN user). Even if you make changes to PUBLIC authentication methods, the DBADMIN user can now connect to the database at any time.
- You cannot modify client authentication records using the Administration Tools. The Administration Tools interface allows you to modify the contents of the vertica.conf file. However, Vertica ignores any client authentication information stored in that file.
- You can manage client authentication records using vsql commands. To use these statements, you must be connected to the database.
This example shows how you configure local trust authentication for the DBADMIN user. As a result, the user can use
vsql with the -h option and does not need to enter a password:=> CREATE AUTHENTICATION v_dbadmin_trust METHOD 'trust' LOCAL; => GRANT AUTHENTICATION v_dbadmin_trust TO dbadmin; => ALTER AUTHENTICATION v_dbadmin_trust PRIORITY 10000;
The next example shows how you configure local hash authentication for DBADMIN. They allow the user to access the Vertica database using the assigned password from any IPv4 address. The DBADMIN user can access the database using
vsql -h --host, the Administration Tools, or any other tools that connects to Vertica:=> CREATE AUTHENTICATION v_dbadmin_hash METHOD 'hash' HOST '0.0.0.0/0';
=> GRANT AUTHENTICATION v_dbadmin_hash TO dbadmin;
=> ALTER AUTHENTICATION v_dbadmin_hash PRIORITY 10000;
=> SELECT SET_CONFIG_PARAMETER('SecurityAlgorithm', 'SHA512');
Create authentication method
localpwd to authenticate users who are trying to log in from a local host using a password:=> CREATE AUTHENTICATION localpwd METHOD 'hash' LOCAL;
Create authentication method
v_ldap that uses LDAP over TLS to authenticate users logging in from the host with the IPv4 address 10.0.0.0/23:=> CREATE AUTHENTICATION v_ldap METHOD 'ldap' HOST TLS '10.0.0.0/23';
Create authentication method
v_kerberos to authenticate users who are trying to connect from any host in the networks 2001:0db8:0001:12xx:=> CREATE AUTHENTICATION v_kerberos METHOD 'gss' HOST '2001:db8:1::1200/56';
Create authentication method
RejectNoSSL that rejects users from any IP address that are trying to authenticate without SSL/TLS:=> CREATE AUTHENTICATION RejectNoSSL METHOD 'reject' HOST NO TLS '0.0.0.0/0'; --IPv4
=> CREATE AUTHENTICATION RejectNoSSL METHOD 'reject' HOST NO TLS '::/128'; --IPv6
Modifying Authentication Records
To modify existing authentication records, you must first be connected to your database. The following examples show how to make changes to your authentication records.
Rename an Authentication Method
Rename the
v_kerberos authentication method to K5, and enable it. All users who have been associated with the v_kerberos authentication method are now associated with the K5 method granted instead.=> ALTER AUTHENTICATION v_kerberos RENAME TO K5 ENABLE;
Specify a Priority for an Authentication Method
Specify a priority of 10 for
K5 authentication:=> ALTER AUTHENTICATION K5 PRIORITY 10;
Change a Parameter
Set the
system_users parameter for ident1 authentication to root:=> CREATE AUTHENTICATION ident1 METHOD 'ident' LOCAL; => ALTER AUTHENTICATION ident1 SET system_users='root';
Change the IP address and specify the parameters for an LDAP authentication method named
Ldap1.
In this example, you specify the bind parameters for the LDAP server. Vertica connects to the LDAP server, which authenticates the Vertica client. If the authentication succeeds, Vertica authenticates any users who have been granted the
Ldap1 authentication method on the designated LDAP server: => CREATE AUTHENTICATION Ldap1 METHOD 'ldap' HOST '172.16.65.196';
=> ALTER AUTHENTICATION Ldap1 SET host='ldap://172.16.65.177',
   binddn_prefix='cn=', binddn_suffix=',dc=qa_domain,dc=com';
Change the IP address, and specify the parameters for an LDAP authentication method named
Ldap1. Assume that Vertica does not have enough information to create the distinguished name (DN) for a user attempting to authenticate. Therefore, in this case, you must specify to use LDAP search and bind:=> CREATE AUTHENTICATION LDAP1 METHOD 'ldap' HOST '172.16.65.196';
=> ALTER AUTHENTICATION Ldap1 SET host='ldap://172.16.65.177',
basedn='dc=qa_domain,dc=com',binddn='cn=Manager,dc=qa_domain,
dc=com',search_attribute='cn',bind_password='secret';
Change the Associated Method
Change the
localpwd authentication from trust to hash:=> CREATE AUTHENTICATION localpwd METHOD 'trust' LOCAL; => ALTER AUTHENTICATION localpwd METHOD 'hash';
ALTER AUTHENTICATION validates the parameters you enter. If there are errors, it disables the authentication method that you are trying to modify.
Client Authentication Configuration Parameter
The advantage of using the
ClientAuthentication configuration parameter is that the changes are implemented immediately across all nodes within the database cluster. You do not need to restart the database.
However, all the database nodes must be up and you must connect to the database before you set this parameter. Most importantly, this method does not verify that records are correctly formed and it does not maintain the records so you can modify them later.
New authentication records are appended to the list of existing authentication records. Because Vertica scans the list of records from top to bottom and uses the first record that matches the incoming connection, you might find your newly-added record does not have an effect if Vertica used an earlier record instead.
To configure client authentication through a connection parameter, use the
ALTER DATABASE statement:=> ALTER DATABASE exampledb SET ClientAuthentication = 'connection type user name address method';
When you specify authentication records, make sure to adhere to the following guidelines:
- Fields that make up the record can be separated by white space or tabs
- Other than IP addresses and mask columns, field values cannot contain white space
Deleting Authentication Records
To delete client authentication record, use DROP AUTHENTICATION. To use this approach, you have to be connected to your database.
To delete an authentication record for md5_auth use the following command:
=> DROP AUTHENTICATION md5_auth;
To delete an authentication record for a method that has been granted to a user, use the CASCADE keyword:
=> CREATE AUTHENTICATION localpwd METHOD 'password' LOCAL;
=> GRANT AUTHENTICATION localpwd TO jsmith;
=> DROP AUTHENTICATION localpwd CASCADE;
Enabling and Disabling Authentication Methods
When you create an authentication method, Vertica stores it in the catalog and enables it automatically. To enable or disable an authentication method, use the ALTER AUTHENTICATION statement.
If an authentication method has not been enabled, Vertica cannot use it to authenticate users and clients trying to connect to the database.
To enable an authentication method:
ALTER AUTHENTICATION v_kerberos ENABLE;
To disable this authentication method:
ALTER AUTHENTICATION v_kerberos DISABLE;
Granting and Revoking Authentication Methods
Before Vertica can validate a user or client through an authentication method, you must first associate that authentication method with the user or role that requires it, with GRANT (Authentication). When that user or role no longer needs to connect to Vertica using that method, you can disassociate that authentication from that user with REVOKE AUTHENTICATION.
Grant Authentication Methods
You can grant an authentication method to a specific user or role. You can also specify the default authentication method by granting an authentication method to
PUBLIC, as in the following examples.- Associate
v_ldapauthentication with userjsmith:=> GRANT AUTHENTICATION v_ldap TO jsmith;
- Associate
v_gssauthentication to the roleDBprogrammer:=> CREATE ROLE DBprogrammer; => GRANT AUTHENTICATION v_gss TO DBprogrammer;
- Associate client authentication method
v_localpwdwith rolePUBLIC, which is assigned by default to all users:=> GRANT AUTHENTICATION v_localpwd TO PUBLIC;
Revoke Authentication Methods
If you no longer want to authenticate a user or client with a given authentication method, use the REVOKE (Authentication) statement as in the following examples.
- Revoke
v_ldapauthentication from userjsmith:=> REVOKE AUTHENTICATION v_ldap FROM jsmith;
- Revoke
v_gssauthentication from the roleDBprogrammer:=> REVOKE AUTHENTICATION v_gss FROM DBprogrammer;
- Revoke
localpwdas the default client authentication method:=> REVOKE AUTHENTICATION localpwd FROM PUBLIC;
Viewing Information About Client Authentication Records
For information about client authentication records that you have configured for your database, query the following system tables in the V_CATALOG schema:
=> SELECT auth_name, is_auth_enabled, auth_host_type, auth_host_address,
          auth_method FROM CLIENT_AUTH;
   auth_name   | is_auth_enabled | auth_host_type | auth_host_address   | auth_method
---------------+-----------------+----------------+---------------------+-------------
 v_ident       | True            | LOCAL          |                     | IDENT
 v_gss         | True            | HOST           | 0.0.0.0/0           | GSS
 v_trust       | False           | LOCAL          |                     | TRUST
 v_ldap        | True            | HOST           | 10.19.133.123/      | LDAP
 RejectNoSSL   | True            | HOSTNOSSL      | 0.0.0.0/0           | REJECT
 RejectWithSSL | True            | HOSTSSL        | 0.0.0.0/0           | REJECT
 v_hash        | False           | LOCAL          |                     | HASH
 v_tls         | True            | HOSTSSL        | 1.1.1.1/0           | TLS
 v_trust       | True            | HOSTSSL        | 2001:db8:ab:123/128 | TLS

(9 rows)
=> SELECT * FROM CLIENT_AUTH_PARAMS;
auth_oid | auth_name | auth_parameter_name | auth_parameter_value
-------------------+---------------+---------------------+------------------------------
45035996273741304 | v_ident | system_users | root
45035996273741332 | v_gss | |
45035996273741350 | v_password | |
45035996273741368 | v_trust | |
45035996273741388 | v_ldap | host | ldap://172.16.65.177
45035996273741388 | v_ldap | binddn_prefix | cn=
45035996273741388 | v_ldap | binddn_suffix | ,dc=qa_domain,dc=com
45035996273741406 | RejectNoSSL | |
45035996273741424 | RejectWithSSL | |
45035996273741450 | v_md5 | |
45035996273904044 | l_tls | |
45035996273906566 | v_hash | |
45035996273910432 | v_ldap1 | host | ldap://172.16.65.177
45035996273910432 | v_ldap1 | basedn | dc=qa_domain,dc=com
45035996273910432 | v_ldap1 | binddn | cn=Manager,dc=qa_domain
To determine the details behind the client authentication used for a particular user session, query the following tables in the V_MONITOR schema:
=> SELECT auth_name, is_auth_enabled, auth_host_type, auth_host_address,
auth_method FROM CLIENT_AUTH;
auth_name | is_auth_enabled | auth_host_type | auth_host_address | auth_method
---------------+-----------------+----------------+---------------------+-------------
v_ident | True | LOCAL | | IDENT
v_gss | True | HOST | 0.0.0.0/0 | GSS
v_trust | False | LOCAL | | TRUST
v_ldap | True | HOST | 10.19.133.123/ | LDAP
RejectNoSSL | True | HOSTNOSSL | 0.0.0.0/0 | REJECT
RejectWithSSL | True | HOSTSSL | 0.0.0.0/0 | REJECT
v_hash | False | LOCAL | | HASH
v_tls | True | HOSTSSL | 1.1.1.1/0 | TLS
v_trust | True | HOSTSSL | 2001:db8:ab:123/128 | TLS
(9 rows)
User Authorization
Database users should have access to just the database resources they need to perform their required tasks. For example, some users need to query only specific sets of data. To prevent unauthorized access to additional data, you can limit their access to just the data that they need to run their queries. Other users should be able to read the data but not be able to modify or insert new data. Still other users might need more permissive access, including the right to create and modify schemas, tables, and views, or grant other users access to database resources.


Comments
Post a Comment