mongoDB - 2.Installation
1.Install MongoDB On Windows
To install MongoDB on Windows, first download the latest release of MongoDB from https://www.mongodb.org/downloads. Make sure you get correct version of MongoDB depending upon your Windows version. To get your Windows version, open command prompt and execute the following command.
Now extract your downloaded file to c:\ drive or any other location. Make sure the name of the extracted folder is mongodb-win32-i386-[version] or mongodb-win32-x86_64-[version]. Here [version] is the version of MongoDB download.
Next, open the command prompt and run the following command.
MongoDB requires a data folder to store its files. The default location for the MongoDB data directory is c:\data\db. So you need to create this folder using the Command Prompt. Execute the following command sequence.
In the command prompt, navigate to the bin directory present in the MongoDB installation folder. Suppose my installation folder is D:\set up\mongodb
Now to run the MongoDB, you need to open another command prompt and issue the following command.
Run the following command to import the MongoDB public GPG key −
Start MongoDB
MongoDB Help
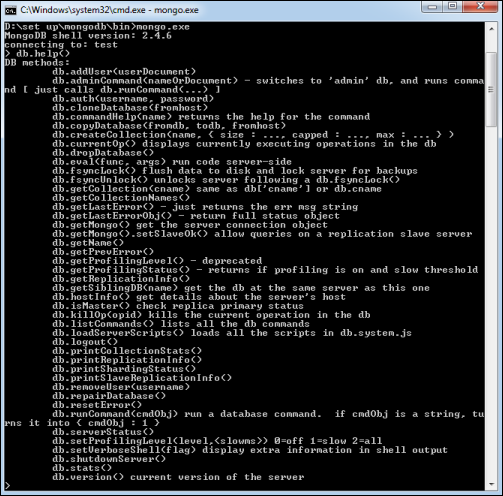
To get a list of commands, type db.help() in MongoDB client. This will give you a list of commands as shown in the following screenshot.
MongoDB Statistics:
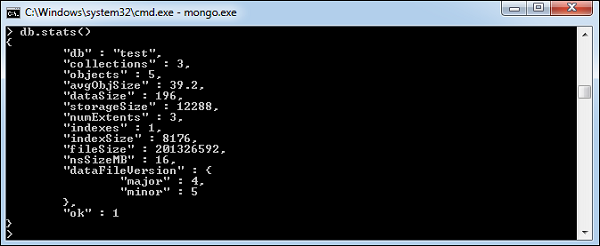
To get stats about MongoDB server, type the command db.stats() in MongoDB client. This will show the database name, number of collection and documents in the database. Output of the command is shown in the following screenshot.
3.Installing Mongo on Mac OS
Getting MongoDB onto your Mac will be a lot easier than Windows. Through the Terminal we can run a few commands to pull down the latest version from MacPorts. The online documentation actually has a small tutorial for Mac OS Xwhich features similar information.
To begin let’s check and update to the latest version of MacPorts. In Terminal enter the command:
After this update completes then we need to run just a single line in the Terminal. This will pull down the most recent MongoDB library files and store them with other system dependencies.
Then you should be able to start the server by running:
This means we have the database service up and running properly. You can test this by visiting http://localhost:28017/ in your web browser. MongoDB provides a small web interface to view more info about your databases and installation.
The last interesting bit here is to force mongod to open immediately when your computer starts. Hunter Ford has an excellent tutorial on his website which is the basis for my code here. By forcing the mongod process as a startup item you won’t need to keep the terminal window open for development.
First you need to download and move this document to: /Library/LaunchDaemons/org.mongo.mongod.plist.
Then in terminal create a small log file and a directory for the new system data:
4.How to Install MongoDB 3.4 on CentOS/RHEL 7/6, Fedora 27/26/25:
This tutorial will help you to install MongoDB 3.4 on CentOS/RHEL 7/6 and Fedora 27/26/25 systems.
Step 1 – Add MongoDB Yum Repository
Add following content in yum repository configuration file mongodb.repo as per your required MongoDB version and system architecture. For this article, we are using MongoDB 3.4 repository.
CentOS and RedHat systems Only
Step 2 – Install MongoDB Server
Let’s use the yum package manager to install mongodb-org package, it will automatically install all its dependencies. To install any specific revision of MongoDB specify package name with version like mongodb-org-3.4.10. The following command will install latest stable version available.
Package mongodb-org-server provided MongoDB init script, Use that script to start service.
Use the following command to check installed MongoDB version
To install MongoDB on Windows, first download the latest release of MongoDB from https://www.mongodb.org/downloads. Make sure you get correct version of MongoDB depending upon your Windows version. To get your Windows version, open command prompt and execute the following command.
C:\>wmic os get osarchitecture
OSArchitecture
64-bit
C:\>
32-bit versions of MongoDB only support databases smaller than 2GB and suitable only for testing and evaluation purposes.Now extract your downloaded file to c:\ drive or any other location. Make sure the name of the extracted folder is mongodb-win32-i386-[version] or mongodb-win32-x86_64-[version]. Here [version] is the version of MongoDB download.
Next, open the command prompt and run the following command.
C:\>move mongodb-win64-* mongodb
   1 dir(s) moved.
C:\>
In case you have extracted the MongoDB at different location, then go to that path by using command cd FOOLDER/DIR and now run the above given process.MongoDB requires a data folder to store its files. The default location for the MongoDB data directory is c:\data\db. So you need to create this folder using the Command Prompt. Execute the following command sequence.
C:\>md data
C:\md data\db
If you have to install the MongoDB at a different location, then you need to specify an alternate path for \data\db by setting the path dbpath in mongod.exe. For the same, issue the following commands.In the command prompt, navigate to the bin directory present in the MongoDB installation folder. Suppose my installation folder is D:\set up\mongodb
C:\Users\XYZ>d:
D:\>cd "set up"
D:\set up>cd mongodb
D:\set up\mongodb>cd bin
D:\set up\mongodb\bin>mongod.exe --dbpath "d:\set up\mongodb\data"
This will show waiting for connections message on the console output, which indicates that the mongod.exe process is running successfully.Now to run the MongoDB, you need to open another command prompt and issue the following command.
D:\set up\mongodb\bin>mongo.exe
MongoDB shell version: 2.4.6
connecting to: test
>db.test.save( { a: 1 } )
>db.test.find()
{ "_id" : ObjectId(5879b0f65a56a454), "a" : 1 }
>
This will show that MongoDB is installed and run successfully. Next time when you run MongoDB, you need to issue only commands.D:\set up\mongodb\bin>mongod.exe --dbpath "d:\set up\mongodb\data"
D:\set up\mongodb\bin>mongo.exe
2.Install MongoDB on UbuntuRun the following command to import the MongoDB public GPG key −
sudo apt-key adv --keyserver hkp://keyserver.ubuntu.com:80 --recv 7F0CEB10
Create a /etc/apt/sources.list.d/mongodb.list file using the following command.echo 'deb http://downloads-distro.mongodb.org/repo/ubuntu-upstart dist 10gen'
| sudo tee /etc/apt/sources.list.d/mongodb.list
Now issue the following command to update the repository −sudo apt-get update
Next install the MongoDB by using the following command −apt-get install mongodb-10gen = 2.2.3
In the above installation, 2.2.3 is currently released MongoDB version. Make sure to install the latest version always. Now MongoDB is installed successfully.Start MongoDB
sudo service mongodb start
Stop MongoDBsudo service mongodb stop
Restart MongoDBsudo service mongodb restart
To use MongoDB run the following command.mongoThis will connect you to running MongoDB instance.
MongoDB Help
To get a list of commands, type db.help() in MongoDB client. This will give you a list of commands as shown in the following screenshot.
MongoDB Statistics:
To get stats about MongoDB server, type the command db.stats() in MongoDB client. This will show the database name, number of collection and documents in the database. Output of the command is shown in the following screenshot.
3.Installing Mongo on Mac OS
Getting MongoDB onto your Mac will be a lot easier than Windows. Through the Terminal we can run a few commands to pull down the latest version from MacPorts. The online documentation actually has a small tutorial for Mac OS Xwhich features similar information.
To begin let’s check and update to the latest version of MacPorts. In Terminal enter the command:
sudo port selfupdate
You can alternatively add the debug flag for verbose output like so:sudo port -d selfupdate
The process could take a few minutes to download and install everything.After this update completes then we need to run just a single line in the Terminal. This will pull down the most recent MongoDB library files and store them with other system dependencies.
port install mongodb
This process could easily take 10-15 minutes even with a quick Internet connection. The install requires a bit of time and could be quicker, but let it go until you get the flashing terminal command open.Then you should be able to start the server by running:
mongod
It should end with the phrase “waiting for connections on port 27017“.This means we have the database service up and running properly. You can test this by visiting http://localhost:28017/ in your web browser. MongoDB provides a small web interface to view more info about your databases and installation.
The last interesting bit here is to force mongod to open immediately when your computer starts. Hunter Ford has an excellent tutorial on his website which is the basis for my code here. By forcing the mongod process as a startup item you won’t need to keep the terminal window open for development.
First you need to download and move this document to: /Library/LaunchDaemons/org.mongo.mongod.plist.
Then in terminal create a small log file and a directory for the new system data:
sudo touch /var/log/mongodb.log
sudo mkdir /var/lib/mongodb
Finally run these following commands to setup the launcher. You can choose to restart your computer afterwards and see if Mongo works right on reboot.sudo chown root:wheel /Library/LaunchDaemons/org.mongo.mongod.plist
sudo launchctl load /Library/LaunchDaemons/org.mongo.mongod.plist
sudo launchctl start org.mongo.mongod
4.How to Install MongoDB 3.4 on CentOS/RHEL 7/6, Fedora 27/26/25:
This tutorial will help you to install MongoDB 3.4 on CentOS/RHEL 7/6 and Fedora 27/26/25 systems.
Step 1 – Add MongoDB Yum Repository
Add following content in yum repository configuration file mongodb.repo as per your required MongoDB version and system architecture. For this article, we are using MongoDB 3.4 repository.
CentOS and RedHat systems Only
vi /etc/yum.repos.d/mongodb.repo
[MongoDB]
name=MongoDB Repository
baseurl=http://repo.mongodb.org/yum/redhat/$releasever/mongodb-org/3.4/x86_64/
gpgcheck=0
enabled=1
Fedora users can install it directory from its official yum repositories.
Step 2 – Install MongoDB Server
Let’s use the yum package manager to install mongodb-org package, it will automatically install all its dependencies. To install any specific revision of MongoDB specify package name with version like mongodb-org-3.4.10. The following command will install latest stable version available.
### CentOS/RHEL 7/6 ###
yum install mongodb-org

### Fedora 27/26/25 ###
dnf install mongodb
Step 3 – Start MongoDB Service
Package mongodb-org-server provided MongoDB init script, Use that script to start service.
/etc/init.d/mongod restartConfigure MongoDB to autostart on system boot.
chkconfig mongod onStep 4 – Check MongoDB Version
Use the following command to check installed MongoDB version
[root@tecadmin ~]#  mongod --version

db version v3.4.10
git version: 078f28920cb24de0dd479b5ea6c66c644f6326e9
OpenSSL version: OpenSSL 1.0.1e-fips 11 Feb 2013
allocator: tcmalloc
modules: none
build environment:
    distmod: rhel70
    distarch: x86_64
    target_arch: x86_64
Connect MongoDB using the command line and execute some test commands for checking proper working.[root@tecadmin ~]# mongo
> use mydb;
> db.test.save( { a: 1 } )
> db.test.find()
{ "_id" : ObjectId("54fc2a4c71b56443ced99ba2"), "a" : 1 }
Now! You have successfully installed mongodb server on your system


Comments
Post a Comment